

jQuery is a powerful JavaScript library that is designed to help with JavaScript programming. I have written several articles on jQuery and how to use it. Now, we will take a look at the jQuery UI library. UI stands for user-interface and the jQuery UI library provides a lot of user interface enhancements for your web site. These UI enhancements include animations, widgets and advanced effects to provide a user experience like no other. In this article, we will look at what is needed to get started with the jQuery UI.
Where to Begin – Themes
The jQuery UI provides a powerful theming engine. It allows you to create a theme for your web site and apply it without too many complications. There are two options: you can download a theme that is already created or create a custom theme from scratch. The jQuery ThemeRoller is very nice. It allows you select different colors, fonts, drop shadows, etc, to match your web page. Let us begin. Go to this page: http://jqueryui.com/themeroller/ to start using the ThemeRoller. You have two options, “Roll Your Own” or “Gallery” (see figure 1).
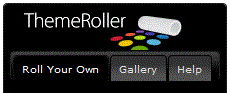
Figure 1, the ThemeRoller
One cool feature of the ThemeRoller is that you can select a theme from the gallery and then customize it to your liking using the roll your own tab. Just select the “Gallery” tab and find the theme you like; then go to the “Roll Your Own” tab and make your tweaks.
As you make changes on the “Roll Your Own” page, you will see those changes reflected by the various widgets and animations on the right side. This makes it easy to make changes and see what those will look like with the various jQuery widgets.
Once you have a theme you like, you can download that theme to your computer. When you click the download button, you will be taken to a page where you can either download the entire jQuery library or pick and choose your items. This makes it very easy to get the smallest download you can.
When you get the download, it will be a “zipped” file with the jQuery libraries, CSS files, and demo pages. The CSS folder is where you theme is stored. There will be a CSS file and a folder with the images used by the widgets. Place these files on your website and reference the CSS file and you are ready to start adding widgets.
Microsoft and Google provide content delivery networks (CDN) for the jQuery UI. They also provide links to the CSS for themes in the gallery. You can find links to this below:
Microsoft: http://www.asp.net/ajaxlibrary/CDNjQueryUI1910.ashx
Google: http://www.devcurry.com/2010/05/latest-jquery-and-jquery-ui-theme-links.html
For the purposes of this article and future articles, we will use the CDNs to help keep the code small and easier for you to reproduce.
What is Next?
Now that you have your theme, it is time to start adding the jQuery UI to your web site. As stated above, you will need to reference these libraries and CSS files. In your <head> tag, you will add this:
	<head>
		<script type="text/javascript" src="http://ajax.aspnetcdn.com/ajax/jQuery/jquery-1.5.1.min.js"></script>
		<script type="text/javascript" src="http://ajax.aspnetcdn.com/ajax/jquery.ui/1.8.10/jquery-ui.min.js"></script>
		<link href="http://ajax.aspnetcdn.com/ajax/jquery.ui/1.8.10/themes/ui-lightness/jquery-ui.css" rel="stylesheet" type="text/css" />
	</head>
The first reference is the <script> reference for the jQuery library. The second <script> reference is for the jQuery UI library. The <link> reference is for the jQuery UI CSS file that will add the theme. The first two <script> references are required to get the jQuery UI to work. You do not have to have a theme, but the UI will look really bland without one.
Now that we have added the appropriate plumbing for the jQuery UI, we can now add some widgets and other items. Let us add a calendar widget. In the <head> tag, we add this:
	<script>
		$(document).ready(function () {
			$("#datepicker").datepicker();
		});
	</script>
In the body tag, we add this:
<p>Date: <input id="datepicker" type="text"></p>
What this code does is attaches a “datepicker” widget to the <input> box (see figure 2).
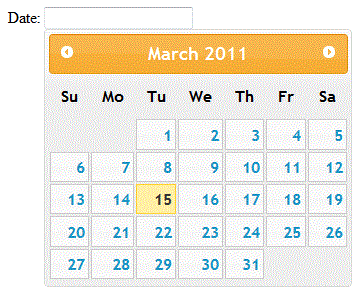
Figure 2, a “datepicker” widget
Conclusion
As you can see, it is very easy to start adding jQuery UI elements to your web site. There are several jQuery UI elements that we can add–we will dive deeper into the date picker and other widgets in future articles.. I hope that you will find this useful and that it will enhance your websites.
Sample Code
	<html>
	<head>
		<script type="text/javascript" src="http://ajax.aspnetcdn.com/ajax/jQuery/jquery-1.5.1.min.js"></script>
		<script type="text/javascript" src="http://ajax.aspnetcdn.com/ajax/jquery.ui/1.8.10/jquery-ui.min.js"></script>
		<link href="http://ajax.aspnetcdn.com/ajax/jquery.ui/1.8.10/themes/ui-lightness/jquery-ui.css" rel="stylesheet" type="text/css" />
		<script>
			$(document).ready(function () {
				$("#datepicker").datepicker();
			});
		</script>
	</head>
	<body>
		<p>Date: <input id="datepicker" type="text"></p>
	<body>
	</html>
